|
IT IS WITH GREAT SADNESS THAT WE SAY FAREWELL TO OUR DEAR FRIEND AND FELLOW ASTRONOMER, TERRY ALFORD. WE HAD MANY FUN ADVENTURES WITH TERRY. HE WILL ALWAYS BE PRESENT IN OUR HEARTS AND MEMORIES. OUR DEEPEST SYMPATHY GOES OUT TO HIS FAMILY. TERRY M. ALFORD B. 5/7/1947 - D. 6/8/2017
2 Comments
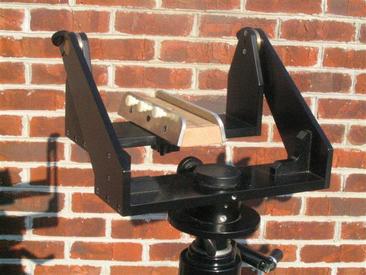
A few years ago I bought an AstroTech 66mm apo refractor. This neat little scope came with a “mounting foot” instead of rings. The foot has a 1/4X20 threaded hole for mounting to a camera tripod. It also has the “Vixen dovetail” shape that easily allows mounting to the popular Vixen dovetail saddle plates that comes on more and more telescopes these days.
I wanted to use this scope on my ancient Unitron alt-az mount. It was not difficult to simply bolt the scope to a wood plate on the mount. But it still looked like a Vixen dovetail saddle plate would be a better alternative. It took only a few minutes on the internet to determine there were plenty of these plates available...at a price. Surely I could make them myself but I am a woodworker, not a metal worker. Even red oak will split along the grain if enough pressure is applied. Then the thought occurred, why not a hybrid of metal and wood? I measured the width and angles on the Vixen mounting foot. The sides were angled at 15°. I took a piece of solid red oak and trimmed the sides at a 15° angle with a table saw. Two short strips of 1/8-inch thick aluminum were trimmed from longer bar stock. Before cutting the aluminum to final size I drilled and tapped 1/4X20 holes to accept thumbscrews. Also I drilled and countersunk some holes that would allow DeckMate screws (some really tough exterior grade deck building screws that do not break or “cam out” when installed) to be used to attach the aluminum to the red oak. Pilot holes in the wood for the screws were drilled and some Goop adhesive was placed between the wood and metal to add extra bonding strength. I made dovetail plates for both the Unitron and a HD alt-az mount. I liked the ease of attaching scopes to these two mounts so much that I also made Vixen style mounting feet for a couple of other scopes. On these smaller scopes I did not bother to attach aluminum plates to the mounting feet as their weight was so small I felt this was not necessary. It is obvious why the Vixen dovetail system is so popular. Scopes are easy to mount without tools. If the Vixen foot and /or saddle are long enough balancing becomes easier too. If you have access to a saw that can cut at a 15° bevel you too can make your own Vixen style mounting system. A few a years ago I obtained a medium duty surveyor's tripod to use with an alt-az mount. I used the tripod/alt-az combo in my yard between the retaining walls a lot last year. During warm weather it was no problem to run in and out of the basement as often as necessary to get an eyepiece or other accessory. During cold weather I became hesitant to opening the door that often and letting in the frigid air. So, my first thought was to make a conventional triangular eyepiece tray like I did for my other surveyor's tripod. But to keep the full sliding leg feature of the tripod I would have to make it with three connectors to lock it to the tripod legs. Although that approach did work I felt it took too much time to set it up. Hmmm, was there another alternative?
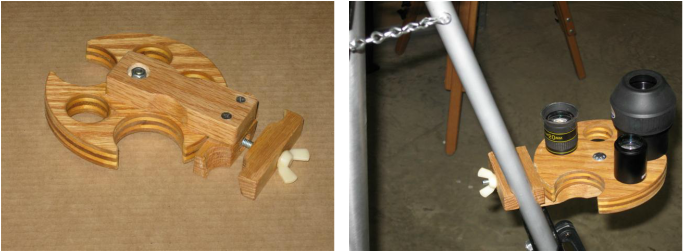
After some thought and a couple of sketches I came up with what you see here. It is an eyepiece “tray” that attaches to the outside of the tripod's leg. It holds two 2 inch eyepieces and four 1.25 in eyepieces. It attaches/detaches in just seconds. Here is how to make your own OET (Outboard Eyepiece Tray). First, cut a piece of hardwood or hardwood plywood into a rectangle about 6.5 by 5.5 inches. This will be the “tray”. Place this piece of wood on a piece of cardboard and trace the outline. This will become a template. Cut several 2-inch and 1.25 in circles out of some thin cardboard or paper. Arrange the circles on the template until you are satisfied that there is clearance for the upper barrels of your “fattest” eyepieces. Push a pencil through the center of each circle and through the template. Use this template to mark the drill points on the wood and drill out the eyepiece holes. Measure the angle that your tripod legs are when fully set up. Next find a piece of scrap hardwood about two by three inches. This piece will become the “clamp”. Drill a .25 inch hole completely through the center of the edge of the piece. Using a wood boring bit drill two holes in this piece at the same angle that you previously measured. The inside edges of the holes should match the same distance the upper tripod legs are separated. The holes should also be the same diameter as the tripod legs. Trim the clamp so that these holes are half-moon in shape. Cut the clamp lengthwise into roughly equal pieces. . Using a .25 in bolt and nut test fit your newly made wooden “clamp” to your tripod legs. You may need to sand it some to get an exact fit. The next step is to use a good wood working glue to attach one piece of the clamp to the edge of the tray. Make sure to use the side that matches the outward angle of your tripod's legs! Allow the glue to dry overnight. The next day use the pre-drilled hole in the clamp as a guide to drill an inch or so deep into the edge of the tray. This hole should be with a 3/16-inch drill bit. Install a hanger bolt with 1/4x20 threads into the edge of the tray. (A hanger bolt is simply a bolt that has wood screw threads on one end and machine threads on the other end.) Be sure the bolt length is long enough that it protrudes at least a half inch past the entire clamp assembly. This will leave plenty of room for a wing nut to thread on for clamping action. All that is left to do now is some sanding of any sharp edges and applying the finish of your choice. To attach the OET to your tripod simply loosen the wing nut a few turns, turn the loose part of the clamp 90°, insert the clamp, turn the clamp back to its original orientation and tighten the wing nut. It takes longer to describe it than to actually do it! Feel free to make your own OET larger, smaller or even a different shape. Whatever floats your boat. This is a quick and easy project that provides nice rewards far beyond it's modest materials cost. A few years ago I (re) built an 8-in f/4 reflector to be used as a richest field scope and occasionally for imaging. It needed a set of rings so the tube could be rotated on an equatorial mount. I ordered a set of cast aluminum tube rings from Orion. Each of the rings has a 1/4x20 drilled and tapped hole on the bottom to attach to a mount head. There is another 1/4x20 hole on the opposite half of the ring to attach a camera or a mounting plate for a guide scope. The rings are built pretty good and they have worked great for their intended purpose.
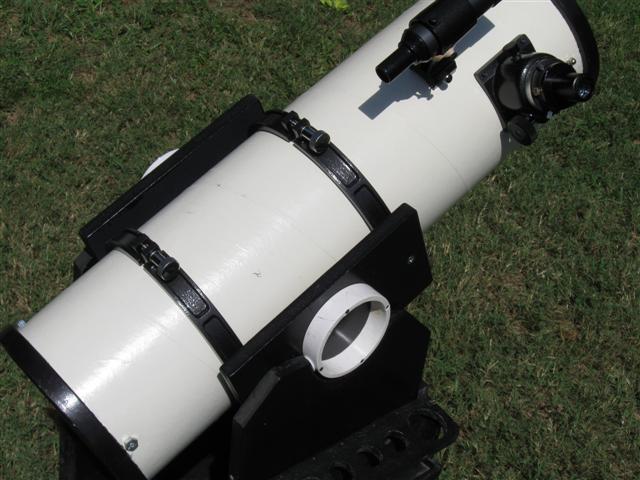
I observed several nights in a row, usually with the 8-in on the Super Polaris equatorial mount. It got to be a pain to drag out the tripod/mount, battery pack and optical tube assembly and put it all together in the yard. Then after observing the process was reversed. How convenient if this scope was on a dob mount I thought one night. No problem, I'll just build one. The next day I remembered how I attached the club's 6-in Meade apo to a dob-style head by using the drilled and tapped holes in the tube rings on the scope. That same approach should work with the dob mount for my 8-in f/6 StarHopper. After a few measurements I was pleased to realize that not only could this be done but it would be even simpler than I had thought. There was a scrap piece of 3/4-in thick MDF (Medium Density Fiberboard) in my shop wood bin that was just right for this project. I cut it into two 6x12-inch pieces. As luck would have it 4-in thick wall PVC pipe has almost exactly outer diameter as the aluminum trunnion bearings on the Celestron scope. Using a chop saw I sliced two 1-in thick rings off of a piece of scrap PVC pipe I saved when the house was built a few years ago. Each ring was edge drilled in four places and the holes were countersunk to allow wood screws to fit flush against the outer edge of the PVC rings. Two coats of black paint were applied to the MDF. Before attaching the PVC trunnions I sanded the outer surface of them with 80 grit sandpaper. I thought that they might be too slick and move too freely against the teflon pads. The assembly was soon completed and the “new' mount was tried out. It worked pretty darn good although the altitude motion was a tiny bit too stiff for my liking. Looks like I should have not been so aggressive with the sand paper. Maybe I will apply some car wax to the PVC to slick them up a little. Now I have two 8-in scopes to use with one dob mount. The f/4 will be there until I want to do some high power planetary viewing. Then the f/6 will be mounted. Let's talk a bit about another tool very important to any woodworker be that person an amateur telescope maker or not: wood glue. A quality wood glue is essential for bonding parts where nails or screws are either not wanted or not really appropriate for the job. Fortunately there are several quality wood adhesives on the market today. I am mostly going to discuss those products that I have had personal experience with. They are all readily available at any hardware or big box home improvement store. One popular glue I have not used is “Gorilla Glue”. When it first came out I was interested but when I read some test reports I did not like the fact that when it cures it can swell out of the joint and is a bear to clean up.
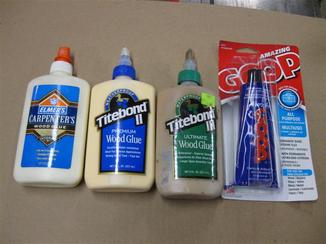
First a short warning about common “white” glue. Do not use this for anything other than crafts like gluing popsicle sticks together. It will not hold up to heavier duty applications. All of the wood glues listed below can be cleaned up with water or scraped off the surface when dried. For many years I only used TiteBond wood glue. It worked fine but it seemed to not be as strong as I would have liked. Then someone gave me a small bottle of Elmer's Woodworking Glue. Now this stuff was even stronger and I liked it better. I probably would have stayed with Elmer's but then TiteBond II came along. After reading some comparison tests I switched to this newer glue, Titebond II. Titebond II Premium Wood Glue has a stronger shear resistance than regular Titebond. It has an “open” time of five minutes. This means the amount of time during assembly or clamping you can move or adjust the parts. After that it is very difficult to do anything other than to let the glue cure. Titebond II was the first one part glue to pass the ANSI type 2 water resistance test. However it is not to be used submerged or below the waterline. It is FDA approved for indirect food contact. A few years ago I took a 1/2-inch hardwood dowel and cut a 6-inch piece off with a table saw. I glued the pieces back together with Titebond II and let it cure for a couple of days. Then I took the dowel and whacked it on a thick board. After five or six slams the dowel broke...but not at the glue joint! This is one tough wood glue. Titebond III Ultimate Wood Glue is even stronger when comparing shear strength. It has an open time of 10 minutes so it is a little more flexible when it comes to assembly time. It is also more water resistant but still should not be used submerged or below the water line. OK, I know we don't use our scopes submerged but let's say you are at a star party and left your wooden observing chair outside overnight and it rained. You would be glad you glued up your chair with a glue like Titebond III. One more thing about these wood glues is that they have a shelf life of about two years. The containers are marked with a code that tells when they were filled but you may have to go to the internet to figure out how to read the code. When you buy glue write the date of purchase on a piece of masking tape and place it on the container. When yellow or white glue gets too old it will start to thicken and will eventually dry up. Keep these glues out of direct sunlight. The other glue in the pic is Amazing GOOP. This stuff is actually pretty amazing. It looks at first glance like it is simply a silicone adhesive. It is more than that. While not strictly a wood glue it will securely glue wood, PVC, metal, glass, etc. It will glue just about anything to anything else. A few years ago I used GOOP to secure a secondary mirror to a shop made wood mirror holder. When I first used the scope it the image obviously had astigmatism. Immediately I suspected that GOOP was causing the problem. Checking the tube did not reveal any solvent that would allow safe removal of the secondary mirror. There was an 800 tech/assistance line so I called it. The guy confirmed my suspicions and said that when GOOP cured it “pulled” parts together even tighter. There was no solvent that would dissolve it but acetone would temporarily soften it. So, using acetone wicked behind the mirror and fishing line I slowly “sawed” through the joint. A quick clean up and I reattached the mirror with regular silicone adhesive and the astigmatism was gone. GOOP is one of my favorite adhesives and not just for wood. One last note: a year or two ago there was a discussion on the Cloudy Nights ATM forum whether to use just good woodworking glue or glue combined with nails or screws to hold a dob base together. There was a spirited discussion but it ended when a well known builder of large dob style telescopes posted that once UPS crushed a package carrying a rocker box. The rocker was broken about everywhere EXCEPT along the glue joints! Fall is my favorite season! Darkness falls sooner. The Summer haze dissipates. Nights are cool and crisp. This is a great time to view many objects in the heavens. Galaxies galore, nebulas abound, star clusters are everywhere and of course there is a multitude (pun intended!) of double/mulitple stars. Here is my arbitrary list of the “best” double stars for Fall and Winter. Again the concentration is on color, ease of splitting (although a couple are pretty close to one another), and just plain attractiveness in the eyepiece. Only three on this list are below the Celestial Equator and the lowest listing is -23°. All can be split with a 4-inch or larger scope and several can be separated with a 60mm refractor. Listed in order of Right Ascension.
Gamma Arietis RA 01 H Dec 19° “Mesarthim” This double is separated by 8 arc seconds so this is an easy split. Both stars shine at a combined magnitude of 3.9. Looks like a pair of headlights pointed at you! Gamma Andromedae RA 02 H Dec 42° Very beautiful and great contrast at blueish and yellow. Striking in even a small scope. It is easy to imagine that one is looking at a star with a huge planet orbiting it. Many amateur astronomers have the opinion that only Alberio is more attractive. A must see for your observing list. Iota Trianguli RA 02 H Dec 30° A nice pair of stars that shine at 5.0 and 6..4 magnitude. Separated by 4 arc seconds. Each star itself is a binary. I have seen this pair many times while scanning for M33. Worth seeking out. Iota Cassopeiae RA 02 H Dec 67° A triple star system at magnitudes of 4.0, 7.0 and 6.2. The brightest star is yellowish while the other two have a blueish cast. Very nice. Gamma Ceti RA 02 H Dec 3° A beautiful pair of yellow and blueish stars that shine at 3.6 and 6.2 magnitudes. Separated by just 3 arc seconds so use a little more magnification. Sigma Orionis RA 5 H Dec -5° The famous “Trapezium”. A must see quadruple star system in the spectacular M42 Great Nebula. The stars range from 4th to 10th magnitude so crank up the magnification of your scope. H3780 Leporis RA 05 H Dec -18° OK, so this object is on hardly anyone's observing list. So why did I include it here? This is a multiple star system with at least six individual stars visible with a large scope. My 8-inch dob routinely shows 4 or 5 stars depending on the seeing. This system could also be described as a small open cluster. The magnitudes vary from 7th to 10th and some stars are pale blue. Not too difficult to find as H3780 is only a couple of degrees East of Alpha Leporis. H3945 Canis Majoris RA 07 H Dec -23°. A 5.0 mag orangish star paired with a 7.0 mag blueish star separated by 27 arc seconds. An easy double that is beautiful to view. Alpha Geminorum RA 07H Dec 32° “Castor” This fine double has white components, both with a greenish tint. They are similar in magnitude at 2.0 and 2.8. Very lovely. Once as a challenge I took an 8x50 right angle finder scope and modified it to accept traditional 1 1/4-in eyepieces. At about 60x the double star was split. Not cleanly as there was chromatic aberration and a fuzziness of image but it was split! Zeta Aquarii RA 22H Dec 00° Close to each other at 4.4 and 4.6 magnitudes. Pale green and yellow separated by only 3 arc seconds. Like Gamma Arietas this pair is often described as appearing like a pair of headlights. Very lovely! Ever find a piece of astro gear that you would call a “diamond in the rough”? In other words, something purchased at a very low price that turned out to be worth more than what you paid for it. Or, it became a collectable or a nice inexpensive observing accessory.
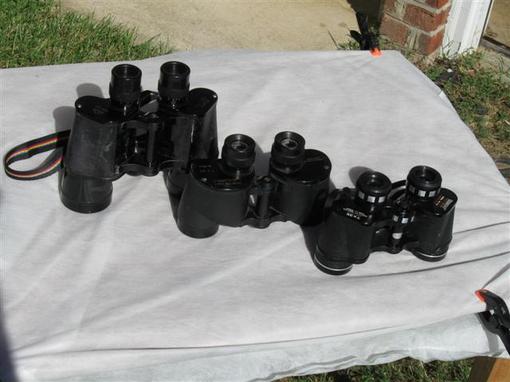
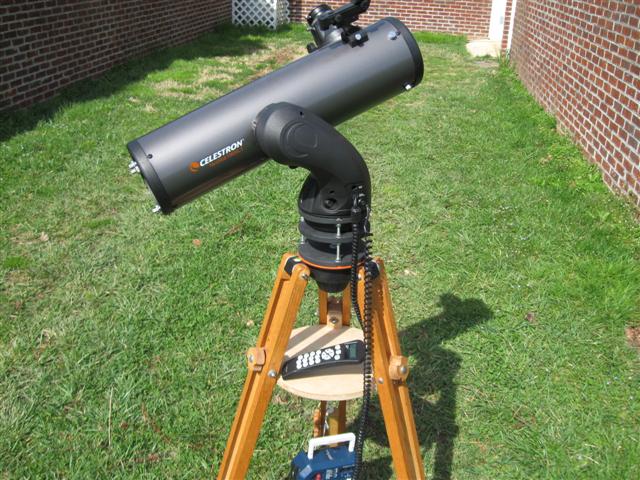
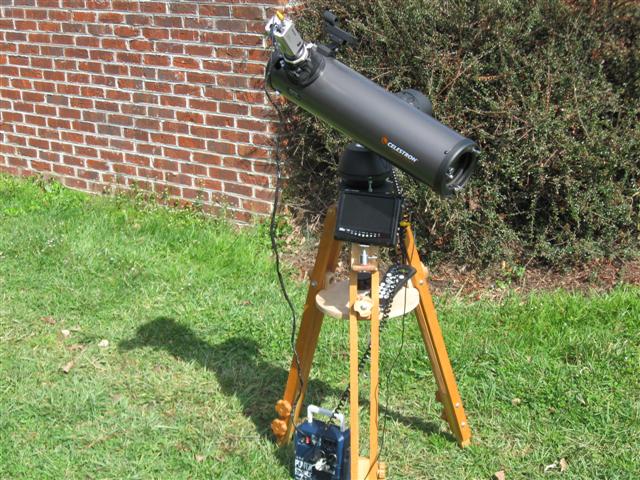
A quarter of a century ago I started visiting visiting garage sales, flea markets and pawn shops looking specifically for a quality 7x50 binocular. I found one in a pawn shop but the price was almost as much as a top of the line NEW binocular. About 14 years ago my wife and I went to the Winter Star Party. We stayed at a house on Big Pine Key. Nearby was a shopping center with a grocery store. As we got out of the car I noticed a very small pawn shop. As my wife was getting groceries I was looking around in the pawn shop. Not seeing anything of interest I asked the shop operator if she had any binoculars. “Only two and they are over there near the window.” One looked fairly new. They were zoom binoculars and terribly out of collimation. I shuddered, put them down and looked at the other one. The case was leather and falling apart. There was no strap. The “pebble grain” surface of the binocular body was mostly gone and the rest was trying to flake off. A long look through the eyepieces and I could tell these 7x50s were in great collimation but there was a haze inside where all the lens coatings had turned to dust. Mechanically they were fine and there were no dings on the body. This binocular looked to be pretty old. I asked the price and she said $15. “Well,” I said, “this binocular will have to be disassembled and the optics re-coated. That alone will cost over $100. Would you take $12.50 to get rid of them?” “ OK” was the response. Back at the rental house I took the binoculars completely apart, cleaned all the optical components with distilled water and re-assembled it. They threw up a nice, sharp view but the lack of coatings made them less bright than they could have been. Still, I was very happy with my rough diamond find. The binoculars were the Meibo brand, now known as Fujinon. Also they were marked”Made in Occupied Japan” so they were built in the late 1940s or early 50s. This is the binocular on the left in the pic. The binocular on the right is also old but only half the age of the Meibo. I found this 7x35 Tasco at a local flea market five of summers ago. It was made when Tasco really had some quality stuff. Both the binocular and case are in excellent condition. It is well worth the $15 I spent on it that day. About six weeks ago we were at the same flea market. We go there with some frequency to buy produce and inexpensive toys and books for the grandkids. I am always on the lookout for astro stuff but about the only things there in that category are small and cheap telescopes that are usually missing some critical parts. At one vendor's booth I saw some 7x35 binoculars that caught my eye. The lady said “Those were made in occupied Japan.” That grabbed my attention but I didn't bite as I have too many 7x35s already. We left the flea market and drove a couple of miles when I said to Cathy, “You know, I'll never forgive myself if I don't go back and get those binoculars”. A quick turnaround, some negotiating and I bought the binos for $15. After getting home I gave them a good cleaning and boy did they need it! There was a brownish residue on the eyepieces, probably from cigarette smoke. The binoculars were heavy for their size. Very solidly built. Individual focusing eyepieces. The field of view was nicely wide, about 10°. Images in the binoculars were sharp in the center but soft towards the edge. Still, very useable. They were marked “Japan”, not “made in”. The only identifying name on them was “Research Optical Company”. I have never heard of that company but the binocular is eerily similar to a Celestron Nova 7x35 I had 25 years ago. I started a thread on the Cloudy Nights binocular forum to see if anyone could tell me more about them. No definite answers but one “expert” said they could not be Japanese made unless they had a JB number on the frame. There is no such number. At least I could not find this mark using a jeweler's loop under a strong light. I guess the “Japan” stamped on the bino and case are there just to fool the purchaser. Whoever made this binocular made a quality product that was not inexpensive when new. A mystery flea market find. I doubt seriously I will ever find an Alvan Clark refractor at a flea market or garage sale but I plan to keep looking. Maybe you will? Who knows what more diamonds in the rough will turn up? ps: A few weeks later a fellow club member did some more research and found out that the "Research Optical Company" made both 7x35 and 7x50s and they are/were a Japanese company. The Celestron 130 SLT I got a couple of years ago is an all around nice little 5.1-in newtonian on an Alt-Az Go-To mount. But no telescope/mount combo is perfect and in order to save manufacturing costs some “lesser expensive” alternative routes were taken. The biggest problem for me was the tripod. The legs are very lightweight and actually sagged a little under the weight of the scope. The tripod spreader was flimsy plastic and looked like it would break if one stared at it hard enough. Oh, the tripod worked. It folded up compactly and was very lightweight. But all this transformed into a lot of scope shaking under the lightest pressure. A sharp tap of my hand on the end of the telescope's tube turned into vibrations that lasted more than six seconds. This was not a major problem when the scope was being used visually as a low power instrument. But it was not acceptable when coupled to my video CCD camera which I use for outreach. The camera operates with much more magnification. The image of the Moon would dance all over the monitor whenever I adjusted the camera or the wind blew very much. The solution was easy. About 20 years ago I built an oak tripod for a Polaris mount. Later this tripod was used on a Super Polaris mount. Later again I added an aluminum tripod with a larger height adjustment range to the SP mount so the oak tripod became available. The tripod was too tall for the small newtonian so I replaced the center, sliding leg sections with shorter pieces of wood. The result was a much more solid arrangement. While the wood tripod added a couple of pounds to the scope's weight dampening time was reduced to less than two seconds. One other undesirable characteristic of the 130 SLT was the maximum altitude the mount could reach. The altitude limit was set at the factory to 60° to keep the scope from hitting the tripod legs. Such a setting totally prevented observing objects higher overhead where they are best seen. There was a definite need for a mount extension. After some experimentation it became obvious that the tube would never clear the base of the mount. But if it could clear the top of the tripod the scope could go much higher it altitude, maybe to 85°. I decided on a 4.5-inch mount extension. I took some scrap 1/2-inch thick plywood and cut out two discs and one ring. Using three sections of 1/4x20 threaded rod and some nuts and washers it was easy to adjust the spacing for maximum effect. The disc in the middle attached to the mount with a bolt and lock washer. A long coupling nut was bolted to the bottom disc to allow the factory hand knob to attach to the pier. I reset the altitude limit to 80°. The scope and mount are absolutely no less stable than in the “factory” mode and this little mod worked great. Total cost was about $4. I started to enclose the mount with painted aluminum flashing but then I remembered what the Mini-Tower looked like... The photos show what the set-up looks like for both visual and astro vidoegraphy.Spring has officially arrived! Last Fall had some nice nights but it seemed like the only clear nights we had last Winter it was either super cold and windy or there was a blindingly bright Moon. With this in mind I am proposing my arbitrary list of the 10 “best” double stars of Spring and Summer. My reasons for choosing these particular multiple stars was position in the sky (no object below -19° in declination), ease of splitting, and any unusual features such as color or contrast. Some of these are not as famous as others but all are well worth seeking out. So, listed in order of right ascension, here is my list of must see double/multiple stars.
Alpha Ursae Minoris RA 01H Dec+89° Polaris, our “North Star”. The brightness of Polaris can sometimes make it difficult to see the much fainter companion star. Try higher magnifications and perhaps averted vision to see the pair's contrasting yellow and blue colors. A 6-in or larger scope will definitely split Polaris. On a steady night a 3-inch scope will work. Gamma Leonis RA 10H Dec+20°, “Algeiba”, This is a splendid double star, bright orange and greenish yellow. My favorite view of this double was about 5 years ago at the Green Bank StarQuest in West Virginia. Bill Burgess and I were standing in a light rain and testing out the then new 80mm f/11.25 Planet Hunter refractor. Observing through gaps in the clouds we got a great view of Jupiter. Then Algieba became visible and it was absolutely stunning. Recently I learned there was a planet discovered in this system. Zeta Ursae Majoris RA 13H Dec +55° Mizar, the Gem of the Big Dipper. Located in the bend of the handle of the Dipper this multiple star system is easy to locate and nearly any optical aid at all will easily spit it. Actually a lot of people with keen vision can split two main components with their naked eyes. Mizar, the brighter one has been found to be a spectroscopic binary as well as the fainter star Alcor. Even a 3-inch scope at 60X will show four stars. This is a favorite of the public during StarWatches. Upsilon Scorpious, RA 16H Dec -19° This is a quadruple system with stars varying from 4.3 to 8.5 magnitude. Binoculars or a finder scope will spit the two brightest components. Very lovely in a scope at 60x or higher. This is also a great area to just scan around in. Other bright and pretty easy doubles nearby. I like using my 4-in f/4 RFT refractor to study this area of the Scorpion's northern “arm”. This is the most southerly target on the list Alpha Herculis, RA 17H Dec +14° Rasalgethi, just to the West and a little farther North than a brighter star Rasalhague (in Ophiuchus) this is a fine contrasting pair with a brighter orange-red primary and a fainter companion that is blueish-green. A scope in the 3-4-inch range will split this pair nicely at a little over 100X. The primary also varies between 3rd and 4th magnitude. Epsilon Scutum RA 18h Dec -15° Two stars of similar magnitude, yellow and deep blue. Very striking. This pair is located in the heart of the Milky Way so it may be a little difficult to locate without setting circles or a Go-To system but worth seeking out. Epsilon Lyra RA 18H Dec +40° The famous “Double Double”. This system is a couple of degrees east of Vega and is pretty easy to locate. Through binoculars or finder scope the first split can be made. A three inch or larger scope used at magnifications around 60X or highter should split each component again. Beta Cygni RA 19H Dec +28° Albireo, the “beak of the bird” of Cygnus, the Swan. For a lot of amateur astronomers this is THE best double star visible in our latitudes. Easily split with even small scopes. The bold colors of gold and deep blue (some people see green) are quite vivid and often startles first time visitors at our StarWatches. A real crowd pleaser. Gamma Delphini RA 20H Dec +16° This beautiful double is the tip of the snout of Delphinus, the dolphin. This somewhat faint constellation can be difficult to find as it lies near to the heart of the Milky Way. It is easy to look at this constellation and imagine a dolphin leaping out of the water. 8 Lacerta RA 22H Dec +39° Lacerta is yet another faint constellation that can be difficult to find but take the time to locate and observe this beautiful quadruple star system. It is well worth the effort to do so. Here are two pretty easy ATM tips.
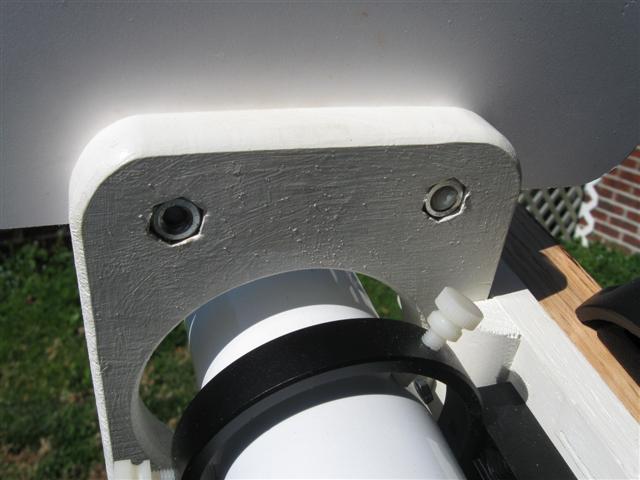
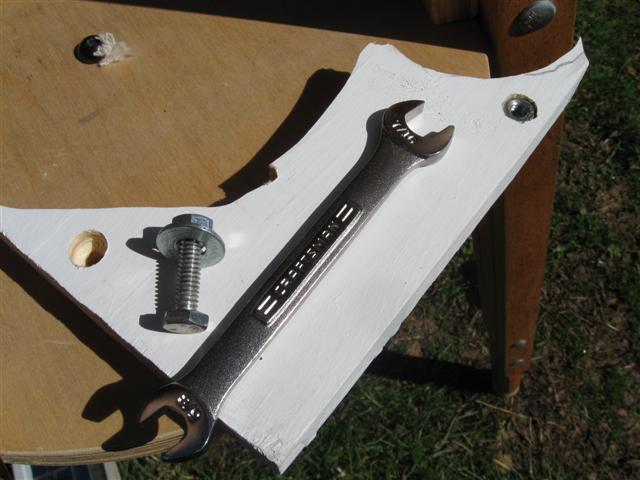
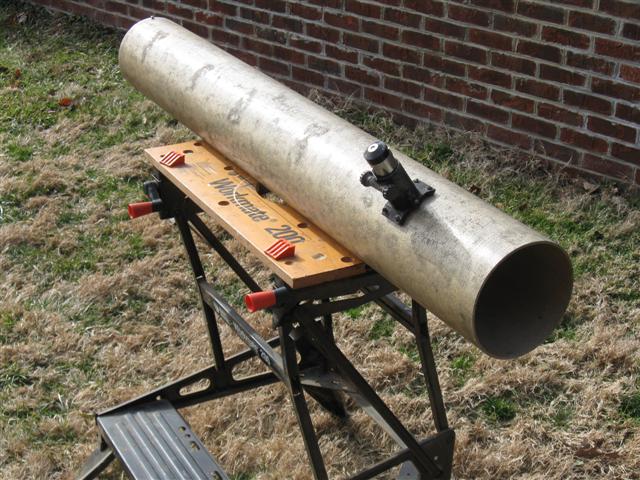
Recently I acquired a very old 6-in f/8 newtonian optical tube assembly. It appeared to have been put together nearly 40 years ago. The tube was fiberglass but had never been painted inside or out. The end of the tube where the primary mirror cell was attached was nice and square. The focuser end of the tube was ragged and a little longer than necessary. Since the OTA needed to be completely disassembled for cleaning and painting anyway I decided to cut a couple of inches off the end of the tube. This cut needed to be square and smooth. But how to do it safely and accurately? There is no shortage of power saws in my shop but I was not sure that was the best way to go. I certainly did not want a lot of fiberglass dust drifting around my basement. Internet research provided some good suggestions. I set up a portable sawhorse/work table outside. A slightly stiff straight edge that could be wrapped around the tube to act as a saw guide was made from an old coarse grit belt sander belt. This was held to the tube with rubber bands and wood spring clamps. A large round wood disc was hammer tapped into the tube until it fit under the saw cut. The wood disc provided a firm support to keep the tube edge from splitting. Finally an electric fan was turned on to blow any fine dust away from the work area. Using a hacksaw with a new fine toothed blade I slowly and carefully cut a shallow kerf, rotating the tube until the cut line went completely around the tube. This was repeated two or three more times, each cut getting deeper. In just a few minutes the soon to be discarded end of the tube fell off. The result was a square cut that was very clean and would only need a minimal amount of sanding. If you try cutting fiberglass be sure to wear a dust mask. For a “Big Dob Project” I needed to make an altitude brake out of red oak. It would be a piece of wood with a knob that when turned it would put pressure on the altitude bearing. Wood threads would soon wear out but there was not enough room in the piece for a T-nut. A threaded brass insert would work but I did not have any of the 5/16-inch size appropriate for this little part. I could have driven to the local Woodcraft store and bought a 10 pack of threaded inserts but surely there was another way. I could have just counter sunk a nut and secured it with epoxy. But the rotational forces would probably cause the epoxy bond to fail after several uses. After some thinking it dawned on me that if a nut could be epoxied into a hole that had exactly the same edge profile as the nut there should be plenty of resistance to those rotational forces. I drilled a 5/16-in hole through a piece of scrap oak. On one side I drilled a hole half way through. This hole was exactly the same diameter as the flats of the nut. Using a washer, a bolt and a wrench I tried to pull the nut into the wood. No go, the oak was too tough. I took a drill bit that was the same diameter as the widest points of the nut and drilled a hole that only went part way into the wood. This time the wrench was able to pull the nut all the way into the hole. Success! I used this same method on the altitude brake part but also put a dab of epoxy in the base of the hole to keep the nut secured. By the way, if you use this method on soft woods such as pine only the first countersunk hole needs to be drilled. The softer fibers of pine will crush easily and the nut goes right in, nice and snug. This is how I put two nuts in the sun shield holder of my solar scope. |
About the Author:
Terry Alford has been an avid amateur astronomer since 1979. He is currently a member of two astro clubs: Bays Mountain Astronomy Club (founding member) and Bristol Astronomy Club. Since 2001 Terry has taught Astronomy Labs at East TN State University. His first ATM project was in 1979 and was an equatorial pipe mount for an 8-in reflector. His woodworking shop also turns out toys for grandkids. Archives
June 2017
Categories |

 RSS Feed
