|
A few a years ago I obtained a medium duty surveyor's tripod to use with an alt-az mount. I used the tripod/alt-az combo in my yard between the retaining walls a lot last year. During warm weather it was no problem to run in and out of the basement as often as necessary to get an eyepiece or other accessory. During cold weather I became hesitant to opening the door that often and letting in the frigid air. So, my first thought was to make a conventional triangular eyepiece tray like I did for my other surveyor's tripod. But to keep the full sliding leg feature of the tripod I would have to make it with three connectors to lock it to the tripod legs. Although that approach did work I felt it took too much time to set it up. Hmmm, was there another alternative?
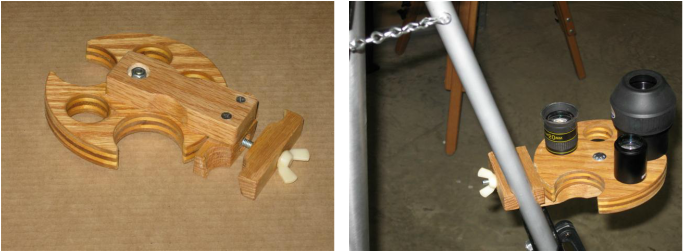
After some thought and a couple of sketches I came up with what you see here. It is an eyepiece “tray” that attaches to the outside of the tripod's leg. It holds two 2 inch eyepieces and four 1.25 in eyepieces. It attaches/detaches in just seconds. Here is how to make your own OET (Outboard Eyepiece Tray). First, cut a piece of hardwood or hardwood plywood into a rectangle about 6.5 by 5.5 inches. This will be the “tray”. Place this piece of wood on a piece of cardboard and trace the outline. This will become a template. Cut several 2-inch and 1.25 in circles out of some thin cardboard or paper. Arrange the circles on the template until you are satisfied that there is clearance for the upper barrels of your “fattest” eyepieces. Push a pencil through the center of each circle and through the template. Use this template to mark the drill points on the wood and drill out the eyepiece holes. Measure the angle that your tripod legs are when fully set up. Next find a piece of scrap hardwood about two by three inches. This piece will become the “clamp”. Drill a .25 inch hole completely through the center of the edge of the piece. Using a wood boring bit drill two holes in this piece at the same angle that you previously measured. The inside edges of the holes should match the same distance the upper tripod legs are separated. The holes should also be the same diameter as the tripod legs. Trim the clamp so that these holes are half-moon in shape. Cut the clamp lengthwise into roughly equal pieces. . Using a .25 in bolt and nut test fit your newly made wooden “clamp” to your tripod legs. You may need to sand it some to get an exact fit. The next step is to use a good wood working glue to attach one piece of the clamp to the edge of the tray. Make sure to use the side that matches the outward angle of your tripod's legs! Allow the glue to dry overnight. The next day use the pre-drilled hole in the clamp as a guide to drill an inch or so deep into the edge of the tray. This hole should be with a 3/16-inch drill bit. Install a hanger bolt with 1/4x20 threads into the edge of the tray. (A hanger bolt is simply a bolt that has wood screw threads on one end and machine threads on the other end.) Be sure the bolt length is long enough that it protrudes at least a half inch past the entire clamp assembly. This will leave plenty of room for a wing nut to thread on for clamping action. All that is left to do now is some sanding of any sharp edges and applying the finish of your choice. To attach the OET to your tripod simply loosen the wing nut a few turns, turn the loose part of the clamp 90°, insert the clamp, turn the clamp back to its original orientation and tighten the wing nut. It takes longer to describe it than to actually do it! Feel free to make your own OET larger, smaller or even a different shape. Whatever floats your boat. This is a quick and easy project that provides nice rewards far beyond it's modest materials cost.
1 Comment
|
About the Author:
Terry Alford has been an avid amateur astronomer since 1979. He is currently a member of two astro clubs: Bays Mountain Astronomy Club (founding member) and Bristol Astronomy Club. Since 2001 Terry has taught Astronomy Labs at East TN State University. His first ATM project was in 1979 and was an equatorial pipe mount for an 8-in reflector. His woodworking shop also turns out toys for grandkids. Archives
June 2017
Categories |


 RSS Feed
