|
Wooden tripods. My,oh my, have I built a few wooden tripods over the years. When making a tripod several things must be considered: what type of optical instrument will it have to support; what is the weight of this instrument and the mount; how tall should the tripod be; should the legs be solid pieces of wood or should the legs be made to slide (this gains compactness at the loss of a little bit of stability and strength); does the tripod need to have the legs secured with a chain or spreader arms with a tray? etc; etc; etc.
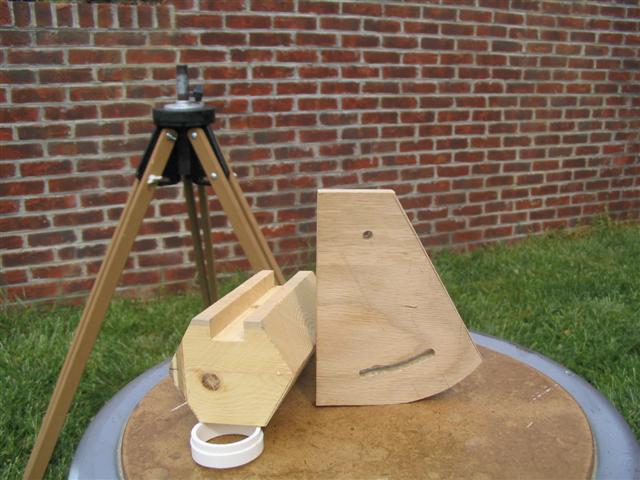
One thing about my tripods that have changed very little over time is the construction of the head. Almost always I started with a large, thick disc of wood and glued/screwed three leg blocks to the underside. Then all the other considerations mentioned above were played in. But the head was essentially finished at this point. About 25 years ago there was a short article that caught my eye in the now defunct Telescope Making magazine. The author, Walter R. Coggan of Seattle, WA, described a different way to build a tripod head for small scopes. His design cleverly incorporated a simple leg locking feature that eliminated the need for spreader arms or chains to keep the legs from splaying about. I was in the need for a simple, sturdy tripod for my “kid's scope”, the 100mm f/4 optical tube assembly made from half of a 25X100 binocular. This ota weighs about 8 pounds with the simple pipe mount it was on and the weight was over taxing the photo tripod I had been using it with. I revisited the Coggan article and decided this could be neat solution for a simple but very sturdy tripod. The photo shows the hexagonal hub that forms the base for the leg anchor system. In the original magazine article the three leg anchor plates attach to the hub via wood screws or dowels that come in from the opposite sides from the plate. I changed this a little by cutting a dado in the side where the leg plate attaches. The leg plates are glued into this tight fitting dado and the whole hub is then glued to the round disc of wood that completes the tripod head. I made this change because there had to be a hole drilled in the hub to allow a length of pipe to slide through and thus allow height adjustment to the telescope. Also, by doing this I was able to make simple fixed length legs out of inexpensive 1X2 pieces of pine. Here are a few more tips on building a “Coggan” tripod head. First, it can be made with a power drill and a jigsaw but table saw and drill press will greatly speed up the process and improve accuracy. After all, hexagonal blocks of wood are not found at Lowes or Home Depot. It is best to glue up a blank out of hardwood or plywood stock. The blank should have a 3/2.5 height/width ratio. The blank for the hub in the photo was 3 inches wide and 2 ½ inches tall. The length was an arbitrary 6 inches. The table saw blade was tilted at 30°. The blank was passed through the blade to leave the hexagonal block, each of the 6 sides the same size. If I wanted to secure the leg plates with dowels or screws it was time to drill the appropriate holes on three sides. In my tripod I had to have a center hole so I returned the table saw blade to 90° and cut a dado the exact depth and width to get a close fit for the leg anchor plate. The slot for the leg anchor plate can be cut with a jig saw, router, rotary power cutter or even a drill press. I used a drill press to make a series of closely spaced holes that are on an arc that pivots from the hole in the top where the bolt for the top of the leg will pass through. Then a file was used to smooth out the slot. The leg anchor plates were next glued into the hub and the whole assembly was glued to the bottom of the large wood disc. For a larger, heavier duty tripod I would recommend using both glue and screws or dowels to add additional strength to the tripod head. For all means be sure to use hardwood or hardwood plywood and a quality wood glue such as Carpenter's or, my favorite, Titebond II. With a little time and not much expense you can built a lightweight, sturdy tripod that is easy to unfold and set up. When you are finished with the observing session it will fold up and the legs will lock in the closed position for transport. The only drawback is that there is no eyepiece tray to hold accessories. For my needs that was not necessary so this little tripod was a neat solution with no drawbacks.
1 Comment
|
About the Author:
Terry Alford has been an avid amateur astronomer since 1979. He is currently a member of two astro clubs: Bays Mountain Astronomy Club (founding member) and Bristol Astronomy Club. Since 2001 Terry has taught Astronomy Labs at East TN State University. His first ATM project was in 1979 and was an equatorial pipe mount for an 8-in reflector. His woodworking shop also turns out toys for grandkids. Archives
June 2017
Categories |


 RSS Feed
